The Best Raspberry Bread: A Juicy, Moist, and Flavor-Packed Loaf
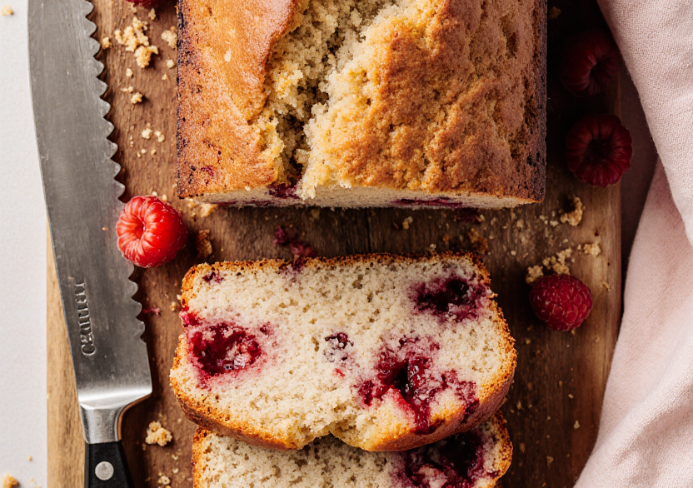
If you love fruity, moist quick breads, then raspberry bread is about to become your new favorite treat. Unlike other fruit loaves, this one is bursting with juicy raspberries in every bite and boasts a super soft texture thanks to a trio of moisture-boosting ingredients—buttermilk, oil, and butter. Whether you’re making it for brunch, dessert, or a sweet snack, this recipe hits all the right notes.
Table of Contents
So what makes this the best raspberry bread? The secret lies not just in the ingredients, but also in the balance of textures, the ratio of fruit to bread, and a few baking tricks that elevate it from average to outstanding.
In fact, you’ll want to bookmark this recipe and come back to it often. From how to keep raspberries from sinking to what variations work best, this guide will help you master this berry-loaded loaf like a pro. Plus, if you’re wondering how to store it, check out these tips on freezing baked goods to keep it fresh for months.
And if you don’t have buttermilk on hand, don’t worry—there are several great buttermilk substitutes for baking that maintain the loaf’s signature tenderness and flavor.
What Makes This Raspberry Bread the Best?
- Moisture-rich ingredients – butter, oil, and buttermilk work together to create a soft and fluffy texture.
- Fruit-forward flavor – nearly 2 cups of raspberries make this more berry than bread.
- Simple pantry staples – no exotic ingredients needed.
- Endlessly customizable – from chocolate chips to citrus zest.
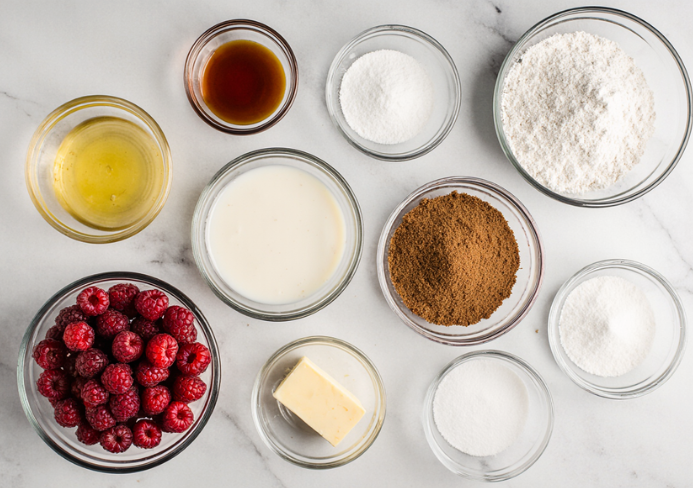
Key Ingredients for the Perfect Raspberry Loaf
To achieve that moist, flavorful result, you’ll need:
- All-purpose flour – the base of the batter
- Light brown sugar and white granulated sugar – for balanced sweetness and flavor depth
- Baking soda – for leavening
- Butter, canola or vegetable oil – for richness and tenderness
- Buttermilk – adds tang and lightness
- Egg – binds everything together
- Vanilla extract – enhances the aroma
- Fresh raspberries – for the best texture and minimal excess moisture
Step-by-Step Instructions
Follow these easy steps for baking your loaf to perfection:
- Prep the pan
Spray a 9×5-inch loaf pan with floured cooking spray or grease and flour it. - Combine the dry ingredients
Mix 2 cups + 2 tablespoons of flour, both sugars, baking soda, and a pinch of salt in a large bowl. - Mix the wet ingredients
Melt the butter, then whisk it with the egg, buttermilk, oil, and vanilla. - Blend wet and dry mixtures
Pour the wet ingredients into the dry and mix just until combined. Do not overmix—lumps are okay. - Toss the raspberries in flour
Lightly coat the raspberries in 2 tablespoons of flour to prevent them from sinking. Here’s why this step matters. - Fold in the berries
Gently incorporate the raspberries into the batter. - Bake
Pour the batter into the prepared pan and bake at 350°F for 45 minutes to 1 hour (longer if using frozen berries). Tent with foil around the 30-minute mark to prevent over-browning. - Cool completely
Let the loaf rest in the pan for 15 minutes, then transfer to a wire rack to cool fully before slicing.
Tips for Raspberry Bread Success
- Use fresh berries for best results—frozen ones release more moisture and can make the bread soggy.
- Let melted butter cool before adding it to eggs to avoid scrambling.
- Avoid overmixing the batter; too much mixing develops gluten, making the bread tough.
- Flour the raspberries so they don’t sink to the bottom of the loaf.
Delicious Variations to Try
Elevate your raspberry bread with these fun add-ins:
- Lemon zest – for brightness
- White chocolate chips – for a sweet contrast
- Almond extract – for a nutty aroma
- Chopped nuts – add crunch with pecans or almonds
- Glaze or drizzle – try a simple lemon glaze or melted white chocolate
Alternative Baking Forms
This batter is versatile and works well in different formats:
- Muffins – Bake at 350°F for 20–25 minutes
- Mini loaves – Great for gifts
- Bundt pan – Adjust baking time accordingly
Nutritional Notes and Storage Tips
- One loaf yields 8–10 slices.
- Stores well at room temperature for 5–7 days in an airtight container.
- For long-term storage, freeze slices individually wrapped for up to 3 months.
FAQ: Your Raspberry Bread Questions Answered
Can I use frozen raspberries?
Yes, but they may make the loaf wetter and require longer baking. Use fresh for best results.
Why did my berries sink?
You likely skipped tossing them in flour. This helps suspend them in the batter.
Can I use yogurt instead of buttermilk?
Yes—plain Greek yogurt or sour cream can work, but you may need to thin it slightly with milk.
How do I know it’s done baking?
Insert a toothpick—if it comes out clean (without hitting a berry), it’s ready.
Can I make it vegan?
Substitute a flax egg and use plant-based milk with lemon juice as your buttermilk alternative.
Serving Ideas for Every Occasion
- Brunch centerpiece – Pair with cinnamon butter or a berry compote.
- Sweet snack – Perfect with coffee or tea.
- Gifting – Mini loaves make great holiday or hostess gifts.
- Dessert option – Drizzle with icing and top with whipped cream or ice cream.
Final Thoughts
This raspberry bread recipe is the kind of treat that impresses guests but is easy enough for weekday baking. With its moist crumb, bright berry flavor, and customization potential, it’s a go-to for any occasion. Whether you’re a seasoned baker or just getting started, this loaf delivers on both flavor and texture every time.
Let it cool completely before slicing, enjoy the burst of raspberry in every bite, and don’t be surprised if it’s gone by the next day. Happy baking!
PrintThe Best Raspberry Bread: A Juicy, Moist, and Flavor-Packed Loaf
- Total Time: 1 heure 10 minutes
- Yield: 1 cake (8 à 10 parts)
Description
Un cake moelleux et fruité aux framboises fraîches, parfait pour le goûter ou le brunch. Facile à préparer, il associe la douceur du sucre brun à l’acidité des framboises, pour une texture tendre et gourmande.
Ingredients
- 2 cups + 4 tablespoons de farine tout usage (divisées)
- ¾ cup de sucre brun clair (compacté)
- ¼ cup de sucre blanc
- 1 teaspoon de bicarbonate de soude
- 1 pincée de sel (optionnel)
- ¼ cup de beurre non salé (fondu)
- 1 gros œuf
- ¾ cup de babeurre (buttermilk)
- ¼ cup d’huile végétale ou de canola
- 2 teaspoons d’extrait de vanille
- 10–12 oz de framboises fraîches (environ 2 cups)
Instructions
- Préchauffez le four à 175°C (350°F). Graissez un moule à cake de 9×5 pouces avec un spray à base de farine ou du beurre fariné.
- Dans un grand saladier, mélangez 2 cups + 2 tablespoons de farine, le sucre brun, le sucre blanc, le bicarbonate de soude et éventuellement le sel.
- Faites fondre le beurre au micro-ondes et laissez-le tiédir. Incorporez l’œuf, le babeurre, l’huile et l’extrait de vanille. Mélangez bien.
- Ajoutez les ingrédients liquides au mélange sec. Remuez juste assez pour combiner. Ne pas trop mélanger (la pâte doit rester grumeleuse).
- Mélangez délicatement les framboises avec les 2 tablespoons de farine restantes, puis incorporez-les à la pâte.
- Versez la pâte dans le moule préparé. Lissez légèrement le dessus.
- Enfournez pour 45 à 60 minutes. À mi-cuisson (30 minutes), couvrez de papier aluminium pour éviter une coloration excessive.
- Vérifiez la cuisson avec un cure-dent (il doit ressortir propre). Laissez refroidir 15 minutes dans le moule, puis démoulez et laissez refroidir complètement sur une grille.
Notes
Utilisez des framboises fraîches de préférence pour éviter un excès d’humidité. Pour une version encore plus gourmande, ajoutez des zestes de citron ou un glaçage au sucre citronné.
- Prep Time: 15 minutes
- Cook Time: 55 minutes
- Category: Pâtisserie
- Method: Four
- Cuisine: Américaine