No-Bake Pumpkin Cheesecake Balls
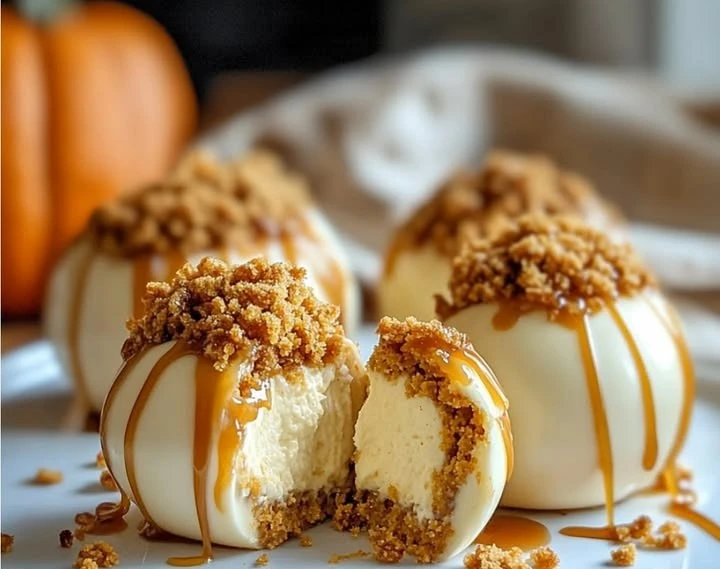
No-Bake Pumpkin Cheesecake Balls : when the leaves start to change color and the air becomes crisp, it’s the perfect time to enjoy all the flavors of fall. One of the most delightful treats that perfectly captures the essence of autumn is the No-Bake Pumpkin Cheesecake Balls. These little bites of sweetness combine the creamy taste of cheesecake with the warm, spicy flavor of pumpkin. They are easy to make and require no baking, making them an excellent choice for those who want a delicious dessert without spending too much time in the kitchen.
In this article, we will take a closer look at why you will love this recipe, how to prepare these delightful bites, and everything you need to know to make your very own No-Bake Pumpkin Cheesecake Balls.
Why You Will Love This Recipe
There are many reasons why No-Bake Pumpkin Cheesecake Balls will become your new favorite treat. First and foremost, they are incredibly easy to make. Even if you are a beginner in the kitchen, you will find that this recipe is simple to follow and requires minimal effort.
Secondly, these cheesecake balls pack a punch of flavor. The combination of creamy cheesecake and pumpkin spice is a perfect match for the fall season. You will love the taste of cinnamon, nutmeg, and cloves mixed with rich cream cheese, all wrapped in a sweet shell.
Moreover, they are a fun and unique dessert to serve at gatherings or parties. Their bite-sized nature makes them easy to enjoy and share. You can also customize them with different coatings, such as crushed nuts, chocolate, or graham cracker crumbs, which adds variation and excitement to each bite.
Finally, these No-Bake Pumpkin Cheesecake Balls are perfect for anyone looking for a gluten-free treat. By using gluten-free ingredients, you can ensure everyone can enjoy them without worry.
How to Prepare No-Bake Pumpkin Cheesecake Balls
Creating these delightful No-Bake Pumpkin Cheesecake Balls is a breeze. You will only need a few key ingredients and some simple steps to follow. Let’s dive into the preparation!
Ingredients:
- 8 oz cream cheese, softened
- 1 cup canned pumpkin puree
- 1/2 cup powdered sugar
- 1 teaspoon vanilla extract
- 1 teaspoon pumpkin pie spice
- 1 cup crushed graham crackers
- 1/2 cup chocolate chips (for coating)
- Optional toppings: finely chopped nuts, crushed Oreos, or extra graham crackers
Instructions:
- Prepare Your Ingredients: Start by gathering all your ingredients. Make sure your cream cheese is softened to room temperature for easy mixing.
- Mix the Filling: In a large mixing bowl, combine the softened cream cheese, canned pumpkin puree, powdered sugar, vanilla extract, and pumpkin pie spice. Use a hand mixer or a whisk to blend them together until the mixture is smooth and creamy.
- Add the Crust: Slowly add the crushed graham crackers to the mixture. Stir well until all the ingredients are combined, and you have a thick, dough-like consistency.
- Shape the Balls: Using your hands, take a small amount of the mixture and roll it into a ball about 1 inch in size. Place the rolled balls on a baking sheet lined with parchment paper.
- Chill in the Refrigerator: Once you have shaped all the balls, cover the baking sheet with plastic wrap and place it in the refrigerator. Allow the cheesecake balls to chill for at least 30 minutes. This will help them firm up and hold their shape.
- Melt the Chocolate: While the balls are chilling, melt the chocolate chips. You can do this in a microwave-safe bowl by microwaving them in 30-second intervals, stirring in between, until fully melted and smooth.
- Coat the Cheesecake Balls: Once the pumpkin cheesecake balls are firm, take them out of the refrigerator. Dip each ball into the melted chocolate, ensuring it is fully coated. You can use a fork to help remove them from the chocolate. Let the excess chocolate drip off.
- Add Optional Toppings: If you want to add some extra flavor and texture, sprinkle your choice of optional toppings over the chocolate coating while it is still wet.
- Chill Again: Place the coated balls back on the lined baking sheet and refrigerate them for an additional 15-20 minutes, or until the chocolate has set.
Congratulations! You have successfully prepared No-Bake Pumpkin Cheesecake Balls.
How to Serve No-Bake Pumpkin Cheesecake Balls
Serving these No-Bake Pumpkin Cheesecake Balls is as easy as making them! You can place the chilled cheesecake balls on a beautiful platter for a stunning presentation. They are perfect for parties, gatherings, or even just a cozy night in.
Feel free to garnish with some additional crushed graham crackers or a drizzle of caramel sauce for an extra special touch. These treats are sure to impress your friends and family, and they make for a delightful end to any meal.
How to Store No-Bake Pumpkin Cheesecake Balls
Storing your No-Bake Pumpkin Cheesecake Balls is straightforward. Place them in an airtight container and store them in the refrigerator. They will stay fresh for up to one week. If you want to keep them for a more extended period, you can freeze them!
To freeze, make sure they are fully set and then place them in a single layer on a baking sheet to freeze for a few hours. Once frozen, transfer them to a freezer-safe container or zip-top bag. They can be frozen for up to three months. When you’re ready to enjoy, simply remove the desired amount and let them thaw in the fridge for a few hours before serving.
Tips for Preparing No-Bake Pumpkin Cheesecake Balls
- Use Room Temperature Ingredients: Ensure that your cream cheese is at room temperature for easy mixing. Cold cream cheese can create lumps in your mixture.
- Be Creative with Toppings: Experiment with different coatings and toppings for added flavor and texture. You can use crushed nuts, colored sprinkles, or even different types of chocolate.
- Make a Big Batch: Since these cheesecake balls are always a hit, consider doubling or tripling the recipe to have plenty to share or to keep in the fridge for later snacking.
- Mix and Match Flavors: For a twist, add some mini chocolate chips or caramel sauce into the filling for an extra burst of flavor.
- Keep it Cool: Make sure to keep the cheesecake balls refrigerated until serving to maintain their shape and texture.
Variation
While the classic No-Bake Pumpkin Cheesecake Balls are delicious as they are, feel free to make some variations to suit your taste. Here are a few ideas:
- Chocolate Pumpkin Cheesecake Balls: Mix in some cocoa powder into the cheesecake mixture for a rich chocolate flavor.
- Spiced Pumpkin Cheesecake Balls: Add more spices such as ginger or allspice to create a different flavor profile.
- Nutty Pumpkin Cheesecake Balls: Incorporate finely chopped nuts like pecans or walnuts into the mixture for added crunch.
Frequently Asked Questions
1. Can I use fresh pumpkin instead of canned pumpkin puree?
Yes, you can use fresh pumpkin. However, make sure to cook and pureé the pumpkin until smooth. Canned pumpkin is often more convenient and consistent in texture.
2. Can I make these in advance?
Absolutely! These cheesecake balls can be made a few days in advance and stored in the refrigerator. They are perfect for meal prep or planning ahead for a gathering.
3. Can I use low-fat cream cheese?
Yes, you can use low-fat or reduced-fat cream cheese for a lighter version of this recipe. The texture and flavor will still be delicious!
4. How can I make these dairy-free?
To make dairy-free No-Bake Pumpkin Cheesecake Balls, you can use dairy-free cream cheese and plant-based chocolate. Be sure to check the ingredients to ensure they fit your dietary needs.
In conclusion, the No-Bake Pumpkin Cheesecake Balls are a fantastic treat to enjoy during the fall season. They are simple to make, full of flavor, and perfect for any occasion. With this recipe, you can easily impress your guests or indulge yourself in a delicious fall-inspired dessert. Don’t hesitate to try it out—you won’t be disappointed!
