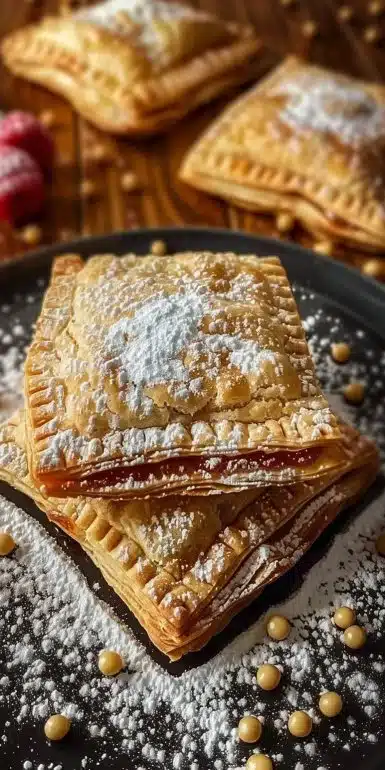
Homemade Pop Tarts
Homemade Pop Tarts
So you’re craving something tasty but too lazy to spend forever in the kitchen, huh? Same. Sometimes, all we want is the comfort of a sweet treat without the complicated fuss. Enter homemade pop tarts. They’re easy to make, utterly delicious, and they’ll make you feel like you’re back in your childhood, eating pastry goodness right out of the box. But with this twist: you made them yourself. Who doesn’t want to score some kitchen cred without breaking a sweat? Let’s dive into how to whip up these delightful pastries that will beat store-bought any day.
Why This Recipe is Awesome
What’s not to love, right? First, you get to choose your own fillings; no more sad, mystery fruit paste that tastes like it was harvested from an alien planet. Second, they’re idiot-proof, even I didn’t mess it up. Seriously, if I can do it, you definitely can. Plus, you’ll feel like a rock star when your friends see you crafting these homemade delights. Just think of the envy when they hear you’re the pop tart whisperer. It’s like you’ve unlocked a new level in the kitchen game.
Ingredients You’ll Need
Alright, before we get our hands all floury, here’s the shopping list you’ll need to create these sweet gems:
- 2 cups all-purpose flour – Because pastry magic requires serious base ingredients.
- 1/2 cup unsalted butter, chilled and diced – Chill out, butter. Seriously, keep it cold.
- 1/4 cup granulated sugar – Sweetness incoming.
- 1/4 teaspoon salt – Can’t forget the salt; it’s like the spice of life.
- 1/4 cup cold water – Just cold, thank you. No warm, cozy water here.
- Your favorite jam or filling (e.g., strawberry, raspberry) – Go wild. What’s your jam?
- Powdered sugar for icing – The pièce de résistance.
- Milk for icing (optional) – To make your icing creamy and dreamy.
- Sprinkles (optional) – Because every pop tart needs a little party on top.
Step-by-Step Instructions
Grab your apron and let’s get rolling (pun very much intended). Here’s how to make your own pop tarts and impress your friends:
- In a large bowl, combine the flour, sugar, and salt. Mix it all together like you mean it.
- Cut in the butter until the mixture resembles coarse crumbs. Channel your inner pastry chef.
- Stir in the cold water until the dough comes together. If it’s a bit too sticky, don’t panic. You’re still good.
- Divide the dough into two balls, flatten them into disks, and wrap in plastic. Pop them in the fridge for at least 30 minutes. That’s right, take a little break.
- Preheat your oven to 350°F (175°C). Now you’re getting serious.
- Roll out one disk on a floured surface to about 1/8 inch thick. Get those muscles working.
- Cut into rectangles (about 3×4 inches). Use a ruler if you want to feel fancy.
- Place a tablespoon of your favorite jam in the center of half of the rectangles. Do not go overboard here, please. Less is more.
- Place another rectangle on top and press the edges to seal them. No one wants a jam explosion.
- Bake for 20-25 minutes until golden. Your kitchen should be smelling divine by now.
- For icing, mix powdered sugar with milk until desired consistency and drizzle over cooled pop tarts. You want a drizzle, not a flood.
- Add sprinkles if desired. Because sprinkles make everything better.

Common Mistakes to Avoid
Let’s save you some potential chaos. Here are the rookie mistakes to dodge while making your homemade pop tarts:
- Thinking you don’t need to preheat the oven – Rookie mistake. Seriously, if you ignore this, you’ll be enjoying raw dough instead of heavenly pastry.
- Overfilling with jam – What do you want, a jam fountain? Too much filling means messy pop tarts and sad faces.
- Not chilling the dough – If you skip chilling, your dough will fight back and make it impossible to roll out. Just don’t do it.
- Cutting the dough in uneven shapes – Unless you want a Picasso-style breakfast, aim for uniformity. It helps with cooking, trust me.
- Using warm butter – Make sure your butter is nice and chilly. You want flaky, not a gooey disaster.
Alternatives & Substitutions
Feel like switching things up? Here are some easy alternatives you can consider for this recipe:
- Flour: You can use whole wheat flour for a healthier option if you feel like being virtuous. Just keep in mind the flavor will be a bit nuttier.
- Butter: Got lactose issues? Use coconut oil or margarine. But let’s not kid ourselves; butter is the bee’s knees.
- Jam: Not feeling fruity? Try Nutella or chocolate spread instead. Life is short; eat dessert first.
- Icing: Want it less sweet? Use Greek yogurt instead of icing for a tangy kick. It’s healthier, so you can justify the sprinkles.
FAQ (Frequently Asked Questions)
So you still have questions. Totally normal. Let’s get into this:
- Can I use margarine instead of butter? Well, technically yes, but why hurt your soul like that? Butter is pure happiness.
- What if I don’t have a rolling pin? Use a wine bottle or your fists if you’re feeling rebellious. No judgment here.
- Can I freeze these pop tarts? Of course! Just make sure they’re extra cold before you freeze them. If you want to save them for a rainy day, I don’t blame you.
- Do I have to use icing? Absolutely not! They’re still delicious plain, but who said no to icing?
- What if I make too much dough? Just freeze the leftover dough. Next time you’re craving something sweet, you’ll be the hero of your own kitchen.
- Can kids help? Heck yeah! Those little hands will love rolling and filling. Just be ready for a bit of mess.
- How do I know when they’re done? Look for that perfect golden-brown hue. Keep an eye on them so they don’t get too crispy.
Final Thoughts
Now that you’re equipped with the knowledge and skills to create your own delectable homemade pop tarts, what’s stopping you? Whether your filling of choice is fruity, chocolatey, or somewhere in between, you’ve got the tools to impress anyone who tastes your creations. You did it, you make actual pastries without a bakery! So put on your best apron, collect those ingredients, and get baking. Now go impress someone—or yourself—with your new culinary skills. You’ve earned it!
Print
Homemade Pop Tarts
- Total Time: 55 minutes
- Yield: 8 pop tarts
- Diet: Vegetarian
Description
Delicious homemade pop tarts that are easy to make and customizable with your favorite fillings.
Ingredients
- 2 cups all-purpose flour
- 1/2 cup unsalted butter, chilled and diced
- 1/4 cup granulated sugar
- 1/4 teaspoon salt
- 1/4 cup cold water
- Your favorite jam or filling (e.g., strawberry, raspberry)
- Powdered sugar for icing
- Milk for icing (optional)
- Sprinkles (optional)
Instructions
- In a large bowl, combine the flour, sugar, and salt. Mix well.
- Cut in the butter until the mixture resembles coarse crumbs.
- Stir in the cold water until the dough comes together.
- Divide the dough into two balls, flatten them into disks, and wrap in plastic. Refrigerate for at least 30 minutes.
- Preheat your oven to 350°F (175°C).
- Roll out one disk on a floured surface to about 1/8 inch thick.
- Cut into rectangles (about 3×4 inches).
- Place a tablespoon of your favorite jam in the center of half of the rectangles.
- Place another rectangle on top and press the edges to seal.
- Bake for 20-25 minutes until golden.
- For icing, mix powdered sugar with milk until desired consistency and drizzle over cooled pop tarts.
- Add sprinkles if desired.
Notes
Ensure to chill the dough for better results and avoid overfilling the pastries.
- Prep Time: 30 minutes
- Cook Time: 25 minutes
- Category: Dessert
- Method: Baking
- Cuisine: American