No-bake Christmas desserts to wow your holiday guests
No-Bake Christmas Desserts to Wow Your Holiday Guests
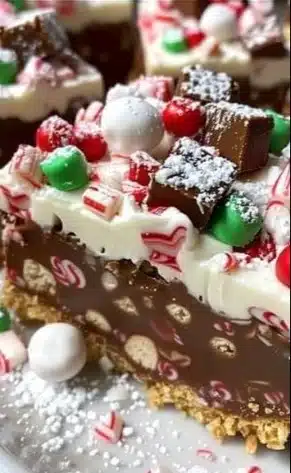
As the holiday season draws near, the air fills with the sweet scent of baked goods and cozy gatherings. While traditional baked desserts have their charm, no-bake treats hold a special place in hearts for their simplicity and quick preparation. One such delight is a festive dessert that not only looks stunning on any holiday table but also brings a flavor punch that your guests will relish. Get ready to dive into a No-Bake Chocolate Peppermint Treat that is bound to impress and satisfy even the pickiest of sweet tooths.
Why Make This Recipe
When it comes to holiday entertaining, this no-bake dessert shines brightly for a number of reasons:
- It captures the classic flavors of Christmas with rich chocolate and refreshing peppermint.
- Quick prep time means more quality moments with your loved ones instead of being stuck in the kitchen.
- Perfect for kids and adults alike; it’s a crowd-pleaser that sparks festive joy.
If you’re seeking a hassle-free yet delightful dessert to complement your holiday festivities, this recipe might just be your new go-to.
Easy Method for No-Bake Chocolate Peppermint Treat
Creating this delightful treat is as simple as it is enjoyable. With just a handful of ingredients, you can whip up a dessert that encapsulates the spirit of Christmas. Follow these easy steps to prepare a no-bake chocolate peppermint treat that will leave your guests swooning.
Step 1: Gather Your Ingredients
Before you start, ensure you have everything you need at hand. Here’s what you’ll require to make this delectable treat:
- 1 cup of crushed graham crackers
- 1/2 cup of unsweetened cocoa powder
- 1/2 cup of powdered sugar
- 1/2 cup of melted butter
- 1 teaspoon of vanilla extract
- 1 cup of mini marshmallows
- 1/2 cup of chocolate chips
- 1/4 cup of crushed peppermint candies
Step 2: Prepare the Base Mixture
Begin by mixing the crushed graham crackers, cocoa powder, and powdered sugar in a medium-sized mixing bowl. This is where the chocolatey goodness begins to take shape. Stir them together thoroughly until well combined to create a uniform mixture. It’s important to get this base right since it will set the foundation for the flavors to come.
Step 3: Incorporate Wet Ingredients
Next, add the melted butter and vanilla extract into the bowl. Mix everything together until the ingredients are fully combined and resemble a thick batter. This step is crucial because the butter acts as the binding agent. If the mixture feels too dry, consider adding a bit more melted butter until you achieve a thick yet workable consistency.
Step 4: Add the Sweet Touch
Now it’s time to fold in the mini marshmallows and chocolate chips. Be gentle during this step to keep the marshmallows intact and to maintain the delightful chewy texture they provide. Mix until the marshmallows and chocolate pieces are evenly distributed throughout your mixture.
Step 5: Form the Treats
Take a lined baking dish (9×9 inches works well) and press the mixture firmly into the bottom. Use the back of a spoon or a spatula to ensure it’s evenly spread and compact. Remember, the firmer you press it down, the better it will hold together once chilled.
Step 6: Add Peppermint Magic
To finish off, sprinkle the crushed peppermint candies generously on top of your mixture. These will add both color and that signature festive flavor.
Step 7: Chill to Perfection
Finally, pop the baking dish into the refrigerator for at least two hours. Allowing your treat to chill and set is the key step that will solidify the flavors and textures. Trust us; the wait will be worth it.
Step 8: Serve and Delight
Once ready, remove the dish from the refrigerator and cut your treat into squares. These little bites of joy are perfect for serving at holiday parties or as a sweet offering to family and friends.

Storing Leftover No-Bake Chocolate Peppermint Treat
Ensuring your treat stays fresh and delightful is paramount in prolonging its enjoyment. Here’s how to store your No-Bake Chocolate Peppermint Treat effectively:
- Refrigerate for up to 3–4 days at 40°F.
- For longer storage, consider freezing the squares for up to 2 months. Make sure to wrap them tightly in plastic wrap, followed by foil, to keep them fresh.
When you’re ready to serve again, simply thaw in the refrigerator overnight.
Serving Suggestions for No-Bake Chocolate Peppermint Treat
When it’s time to present your delicious no-bake treat, the possibilities are as delightful as the dessert itself. Here are a few ideas to elevate your serving game:
- Serve alongside a scoop of peppermint ice cream for an indulgent pairing.
- Drizzle with warm chocolate sauce for an extra touch of decadence.
- Create a layered dessert in a glass dish, alternating layers of the treat with whipped cream and crushed peppermint for a stunning visual.
- Garnish with a sprig of fresh mint or a sprinkle of cocoa powder for added flair.
Other Ideas
Another great way to serve these treats is in festive cupcake liners, making for easy grab-and-go desserts that are perfect for gatherings. For adults, consider a pairing with hot chocolate or coffee for a cozy after-dinner treat.
Tips to Make No-Bake Chocolate Peppermint Treat
- Make it richer: Opt for dark chocolate chips instead of semi-sweet for a deeper flavor.
- Add some crunch: Consider incorporating nuts like walnuts or crushed almonds to add that delightful texture.
- Experiment with flavors: Use flavored extracts, such as peppermint or almond, to give the dessert a unique twist.
Variations or Substitutions
If you’re feeling adventurous, why not experiment with different variations? Here are a couple of ideas:
- Nutty Delight: Swap out some of the graham crackers with crushed nuts for a more textured dessert. Pecans or hazelnuts offer a delicious alternative.
- Dairy-Free Option: Substitute the butter with coconut oil and use dairy-free chocolate chips to create a vegan-friendly version that everyone can enjoy.
FAQs
-
Q: Can I make this ahead of time?
A: Absolutely! You can prepare the treat a day in advance and let it chill overnight. Just remember to tightly wrap it to maintain its freshness. -
Q: How do I keep it from being too soft?
A: Ensure that you are using enough butter to bind the ingredients together. If it seems too crumbly, adding a bit more melted butter can help. -
Q: Can I add more marshmallows or chocolate chips?
Absolutely! These ingredients can be adjusted per your preference. Just make sure the mixture stays thick enough to hold together.
As the festive season beckons, it’s important to have delightful desserts ready to impress your guests. With this No-Bake Chocolate Peppermint Treat, you can enjoy all the festive smells and flavors without enduring hours in the kitchen. This dessert not only offers a mouthful of holiday cheer but also provides a quick and easy solution to your Christmas dessert dilemmas. Enjoy, and happy holidays!
Print
No-Bake Chocolate Peppermint Treat
- Total Time: 135 minutes
- Yield: 16 servings
- Diet: Vegetarian
Description
A festive no-bake dessert featuring rich chocolate and refreshing peppermint, perfect for holiday gatherings.
Ingredients
- 1 cup of crushed graham crackers
- 1/2 cup of unsweetened cocoa powder
- 1/2 cup of powdered sugar
- 1/2 cup of melted butter
- 1 teaspoon of vanilla extract
- 1 cup of mini marshmallows
- 1/2 cup of chocolate chips
- 1/4 cup of crushed peppermint candies
Instructions
- Gather all ingredients.
- Mix crushed graham crackers, cocoa powder, and powdered sugar in a medium bowl.
- Add melted butter and vanilla extract; mix until combined.
- Fold in mini marshmallows and chocolate chips gently.
- Press the mixture into a lined 9×9 inch baking dish.
- Sprinkle crushed peppermint candies on top.
- Chill in the refrigerator for at least two hours.
- Cut into squares and serve.
Notes
Perfect for storing in the refrigerator for 3-4 days or freezing for up to 2 months, wrapped tightly.
- Prep Time: 15 minutes
- Cook Time: 120 minutes
- Category: Dessert
- Method: No-Bake
- Cuisine: American