Cranberry Orange Tart
Cranberry Orange Tart: 5 Steps to Pure Joy
There are few things that can uplift your spirits and fill your home with warmth quite like the scent of a fresh cranberry orange tart baking in the oven. Whether you are gathering around the table for a holiday celebration or simply indulging in an afternoon treat, this delightful pastry captures the essence of cozy moments. The blend of tart cranberries and zesty oranges provides a perfect balance of sweet and sour, making it a universally adored dessert that’s sure to please any palate.
Why Make This Recipe
This cranberry orange tart is not just another dessert; it’s a delightful treat that offers multiple benefits:
- The unique flavor combination appeals to both those who love fruity flavors and those who appreciate a rich, buttery crust.
- The tart is versatile enough to be enjoyed on various occasions, from festive holidays to summer picnics.
- Whipping this tart together is straightforward, making it accessible for bakers of all skill levels.
With this recipe in hand, you’re on the path to creating a dessert that resonates with joy and satisfaction long after the last crumb has been savored.
Easy Method for Cranberry Orange Tart
Creating this beautiful cranberry orange tart may seem intimidating, but it can actually be accomplished with ease by following these simple steps. Get ready to roll up your sleeves and dive into a culinary adventure that will leave your taste buds buzzing with delight!
Step 1: Preparing the Crust
Begin by preheating your oven to 350°F (175°C). This step is crucial because it ensures the crust bakes evenly.
In a medium-sized mixing bowl, combine 1 1/2 cups of all-purpose flour, 1/4 cup of powdered sugar, and 1/4 teaspoon of salt. Stir these dry ingredients until they are well blended.
Next, add 1/2 cup of softened unsalted butter to the flour mixture. Use your fingers or a pastry cutter to mix the ingredients together until the texture becomes crumbly. This will form the base of your tart.
Take the crumbly mixture and press it evenly into a tart pan, making sure to cover the bottom and edges thoroughly. The goal is to create a firm and even surface that will hold the delicious filling you’re about to prepare.
Bake the crust in your preheated oven for about 15 minutes. This initial baking time sets the foundation for your tart, giving it the right structure.
Step 2: Making the Filling
While your tart crust is getting golden brown, it’s time to whip up the delightful filling. In another bowl, combine 1 cup of fresh cranberries, 1/2 cup of granulated sugar, 1/4 cup of freshly squeezed orange juice, and the zest of 1 tablespoon of orange. This mixture brings together all the fruity goodness that will define your tart.
In a separate bowl, whisk together 2 large eggs and 1 teaspoon of vanilla extract until the mixture is smooth and well-combined. The eggs will act as a binding agent, bringing everything together harmoniously.
Now, add the egg mixture to the cranberry mixture and stir well. You want to ensure that every cranberry is beautifully coated with the sweet and zesty filling.
Step 3: Assembling the Tart
Once your crust is baked and has cooled slightly, it’s time to pour the cranberry filling over the crust. Do this gently to avoid any spillage.
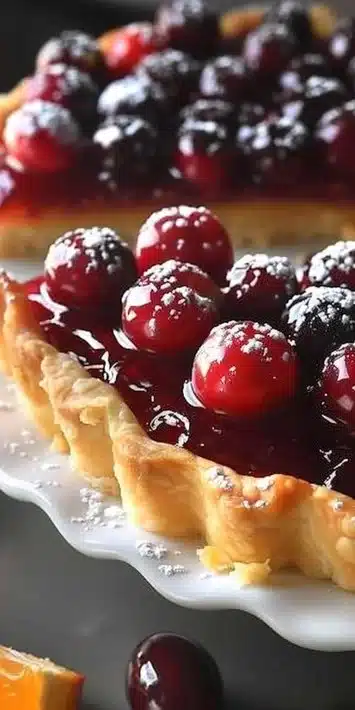
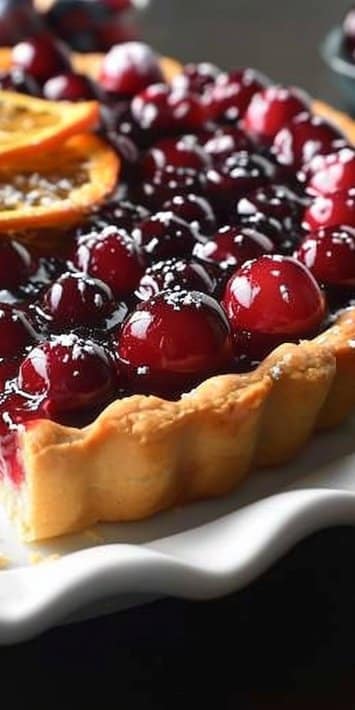
Spread the filling out evenly across the tart. The bright red cranberries should be visible, peeking through the luscious egg mixture, adding visual appeal to your creation.
Step 4: Baking the Tart Again
Slide the tart back into the oven and bake for an additional 25-30 minutes. Keep an eye on it; you want the filling to set but not overcook. The filling will firm up as it bakes. You’ll know it’s done when a slight jiggle remains in the center, and it has a beautiful golden hue on top.
Step 5: Cooling and Serving
Once your golden cranberry orange tart is ready, allow it to cool down to room temperature. Patience is key here, as the cooling process helps the filling firm up even more. You’ll want to serve this delicious treat at the perfect set temperature.
Once cooled, you can slice it into wedges and serve it as is, or for an extra touch of elegance, sprinkle some powdered sugar on top or add a dollop of whipped cream. The vibrant colors and enticing aroma will draw everyone to the dessert table, eagerly awaiting a slice.
Storing Leftover Cranberry Orange Tart
Once your tart has vanished from the serving plate, you might find yourself with a couple of slices left over. Here’s how to keep your remaining tart fresh:
- Store in the refrigerator for up to 3–4 days at 40°F.
- For longer storage, freeze it for up to 2 months. Ensure it is wrapped tightly in plastic wrap or aluminum foil to prevent freezer burn.
- Thaw overnight in the refrigerator before serving, then bring it back to room temperature for the best flavor experience.
Best Ways to Serve Cranberry Orange Tart
When it comes to serving your cranberry orange tart, there are several delightful options to elevate your dessert presentation:
- Classic Slice: Serve the tart at room temperature as is, allowing the tartness of the cranberries to shine through.
- With Whipped Cream: A dollop of freshly whipped cream can add a rich, creamy texture that complements the tart filling perfectly.
- Ice Cream Accompaniment: Vanilla or orange-flavored ice cream pairs beautifully with the tartness of the cranberries, enhancing the overall flavor profile while adding a chilly contrast.
- Garnish with Mint: Adding a sprig of fresh mint not only looks beautiful but also introduces a refreshing element that cuts through the sweetness.
- Pair with Tea or Coffee: Look to contrast flavors by serving it with a mildly flavored tea, like chamomile or a light coffee blend, making it a perfect afternoon treat.
Tips to Make Cranberry Orange Tart
Here are some helpful tips to ensure your cranberry orange tart turns out perfectly every time:
- Use fresh cranberries whenever possible for the best flavor; frozen cranberries can alter the texture.
- Don’t skimp on the zest! It’s key to bringing out that wonderful orange flavor which perfectly complements the cranberries.
- It’s essential not to overmix the filling to keep a light texture; just stir until ingredients are well blended.
Variations or Substitutions
If you’re feeling adventurous or have specific dietary requirements, you can easily modify this recipe to suit your needs:
- Gluten-Free Option: Substitute the all-purpose flour with a gluten-free flour blend. Ensure the blend contains xanthan gum for proper binding.
- Sweetened Condensed Milk: Replace granulated sugar with sweetened condensed milk to create a creamier filling that’s less tart and more smooth.
- Add Nuts: For a delightful crunchy texture contrast, consider adding chopped walnuts or pecans to the filling. Just a handful will enhance the overall taste.
FAQs
Q: Can I make this ahead?
A: Absolutely! You can prepare the tart a day in advance. Just allow it to cool fully and store in the refrigerator. Bring to room temperature before serving.
Q: Can I use canned cranberries instead of fresh?
A: While fresh cranberries are ideal for flavor, you can use canned cranberries in a pinch. Be mindful that these may be sweeter, so adjust the sugar accordingly.
Q: How do I know when the tart is completely baked?
A: Look for a firm filling with a slight jiggle in the center and a golden top. It will continue to set as it cools.
Q: Can I use a different fruit?
- Feel free to swap cranberries for raspberries or blueberries for a different yet delightful tart flavor. Adjust sugar based on the sweetness of the fruit.
Q: What should I do if my filling is too runny?
- If your filling seems on the runny side, you can bake it a little longer until it sets up, or you can add a tablespoon of cornstarch mixed with cold water to thicken the mixture before baking.
Nutritional Information
While enjoying your cranberry orange tart, you also want to keep track of your nutritional intake. Here’s a rough breakdown based on a standard serving:
- Calories: Approximately 250
- Total Fat: 12g
- Saturated Fat: 7g
- Carbohydrates: 35g
- Fiber: 2g
- Protein: 3g
- Sugars: 15g
These values can vary based on ingredient substitutions, so make adjustments as necessary.
Conclusion
Crafting a cranberry orange tart is more than just a baking project; it’s a delightful journey that brings joy to the kitchen and creates lasting memories around the table. The combination of tart cranberries and zesty orange beautifully balances the sweet buttery crust, resulting in a treat that is not only visually appealing but also tasting like a slice of happiness. Whether you’re making it for a special occasion or simply treating yourself to a little luxury, this recipe is sure to leave an impression. So grab your apron and make this tart a beloved staple in your recipe collection!
Print
Cranberry Orange Tart
- Total Time: 60
- Yield: 8 servings
- Diet: Vegetarian
Description
A delightful blend of tart cranberries and zesty oranges in a buttery crust, perfect for any occasion.
Ingredients
- 1 1/2 cups all-purpose flour
- 1/4 cup powdered sugar
- 1/4 teaspoon salt
- 1/2 cup unsalted butter, softened
- 1 cup fresh cranberries
- 1/2 cup granulated sugar
- 1/4 cup freshly squeezed orange juice
- Zest of 1 orange
- 2 large eggs
- 1 teaspoon vanilla extract
Instructions
- Preheat your oven to 350°F (175°C).
- Combine flour, powdered sugar, and salt in a bowl. Mix well.
- Add softened butter and blend until crumbly, then press mixture into a tart pan to form the crust. Bake for 15 minutes.
- In a bowl, mix cranberries, sugar, orange juice, and orange zest. In another bowl, whisk eggs and vanilla; combine with cranberry mixture.
- Pour the filling into the baked crust and return to the oven. Bake for an additional 25-30 minutes until set. Cool to room temperature before serving.
Notes
For an extra touch, serve with whipped cream or ice cream. Store leftovers in the refrigerator for up to 3-4 days.
- Prep Time: 15
- Cook Time: 45
- Category: Dessert
- Method: Baking
- Cuisine: American